 Italy
Italy
Spook Up Your Decor: Create a Pumpkin Rope Basket with a Hidden Surprise!
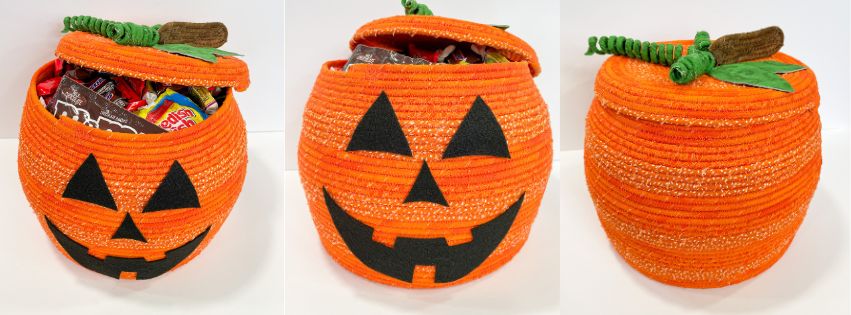
Spook Up Your Decor: Create a Pumpkin Rope Basket with a Hidden Surprise!
Elevate your Halloween decor with a project that’s as functional as it is festive. With the power and precision of the SINGER® Heavy Duty Sewing Machine, you’ll effortlessly stitch together this unique pumpkin rope basket. Complete with a lid, it’s perfect for stashing away all your Halloween treats—or tricks! The creative possibilities are endless, allowing you to customize the basket with your own spooky flair.
In this tutorial, we’ll guide you step-by-step to craft a show-stopping piece that will be the highlight of your seasonal decor. Whether you’re keeping candy under wraps or simply adding a touch of handmade charm to your home, this pumpkin basket is a must-make for the season. Let's get sewing and bring some Halloween magic to life!
What you need:
- Cotton Cording (braided is preferred) 24-50 yards in .15” to .25” thickness
- All purpose Sewing Thread (to match your fabric colors))
- Denim Needles
- Extra Bobbins
- Straight pins or clips
- Pattern cotton fabric (orange, green & brown)
- Black Felt
- Liquid Seam Sealant (optional)
- Polyester or Cotton Batting
- LightWeight Fusible Interfacing
- Rotary Cutter & Mat
- Ruler
- Hand Sewing Needle
- Fabric Stiffening Spray
Steps to Prepare Materials:
- Cut orange, brown and green fabrics in 1 inch strips along the bias. Leave enough green fabric to cut out the leaves. You will need a lot of orange strips but only a few brown and green strips of fabric.
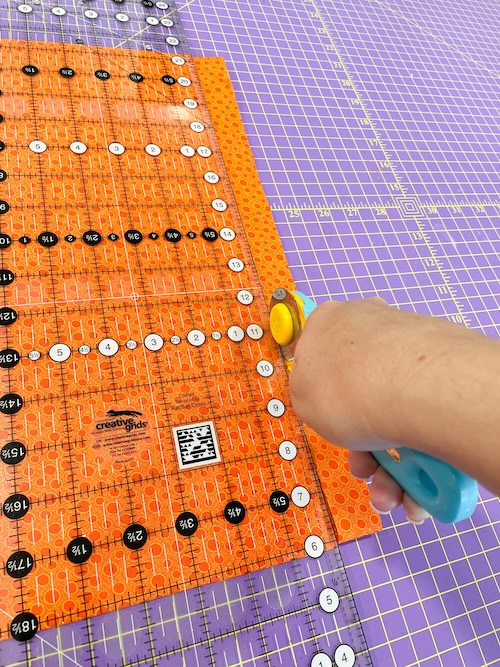
- PRO-TIP: Bias cut means cutting the fabric on a 45 degree angle to the straight grain. Cutting the fabric strips on the bias helps give the cotton fabric some stretch when wrapping around the rope and helps prevent fraying.
- To add some variation to your basket try using a few different shades or patterns of orange fabric to switch between when sewing.
- Thread your sewing machine with the orange thread first and have a denim needle in place
- Have extra bobbins wound and ready to sew
- If your cording does not come on a spool like pictured, I recommend unwinding it and then rolling it into a ball. This will prevent twisting and knots as you sew.
Put it All Together:
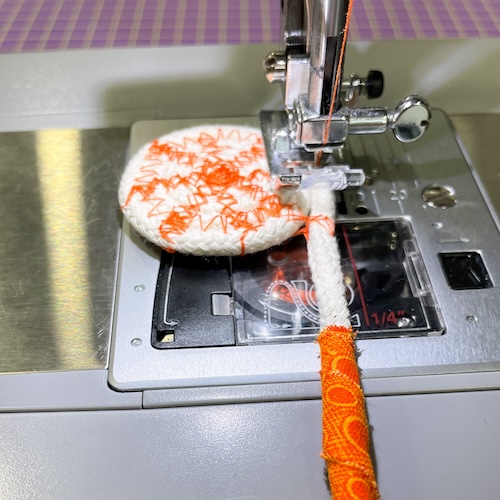
- Find the end of your rope and trim off any frays if necessary. You can use a dab of liquid seam sealant.
- Begin rolling the rope tightly in a clockwise direction as pictured until you get a circle approximately an inch in diameter.
- PRO TIP: You can use straight pins to hold the rope in place until you begin stitching it together. Just be careful not to sew over any pins.
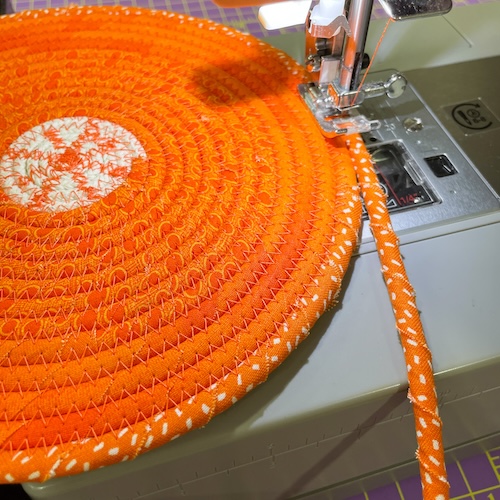
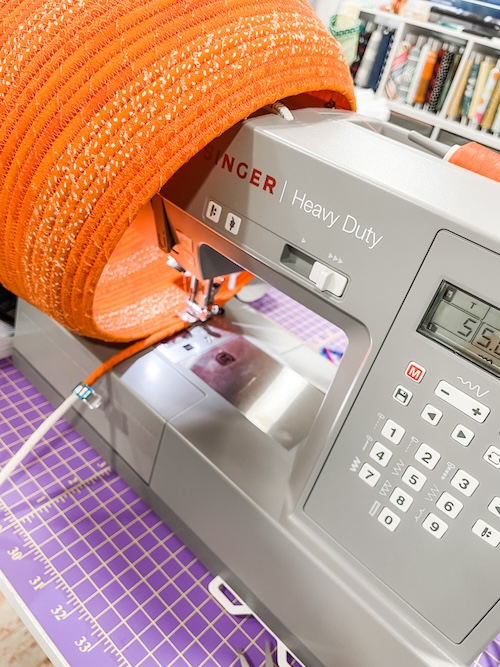
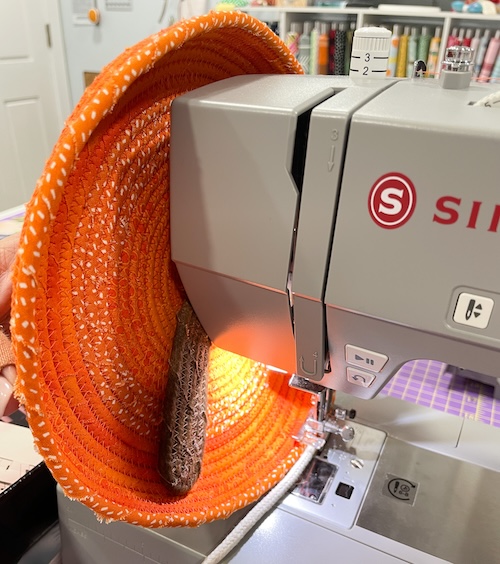
- Place the circle under foot with the rope coming off the right side towards you as pictured.
- Set your sewing machine to a zig zag stitch with a width of 5mm and a length of 2.5mm.
- Stitch straight across your circle several times to secure your starting circle and trim all thread tails.
- Position your circle under the needle just before where the rope is not attached to the circle yet. Make sure the center of your foot follows the “line” where the loose rope meets the circle.
- With the presser foot down holding the circle secure, take your first orange fabric strip and begin wrapping it clockwise around the rope tightly. Use a clip or straight pin to secure the starting and ending point of your strip of wrapped fabric to the rope.
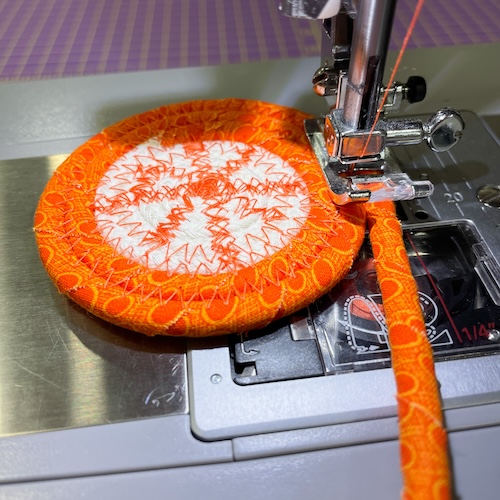
- Once your fabric strip is wrapped around the rope you can begin sewing again.
- Be sure to remove the pins before sewing the wrapped rope onto the basket!
- Use the zig zag stitch to secure the loose fabric wrapped rope to the inside circle by ensuring the needle catches both the loose rope and the sewn circle.
- Always backstitch at the beginning and end of your zig zag stitch to secure it in place.
- As you slowly work your way around the circle, be sure to not pull hard on the rope. Just use your fingers to gently turn the circle and place the rope along the outside edge.
- PRO TIP: Work slowly to prevent gaps or missed stitches as it will weaken the strength of your basket.
- In the beginning you will need to reposition the circle to stay in alignment with the rope. The easiest way to do that is leave your needle in the down position holding your last stitch, lift the foot, reposition the circle, lower the foot, then keep stitching. You will need to do this until the circle gets large enough to easily follow the rope.
- Continue stitching round and round using your left hand to turn the circle and hold it flat while your right hand guides the new rope into place.
- Before you get to the end of your rope that is wrapped in fabric, go ahead and start wrapping another strip picking up where the previous strip ended. I find it easiest to overlap them a little to create a seamless look.
- When sewing a basket you will need an extension table that attaches to your sewing machine as it is critical that the base circle of your basket is sewn completely flat in order for it to sit flat when finished. or
- PRO-TIP: If you don’t have an extension table for your sewing machine you can use some books or a box to the left of your sewing machine that is completely level with your machine.
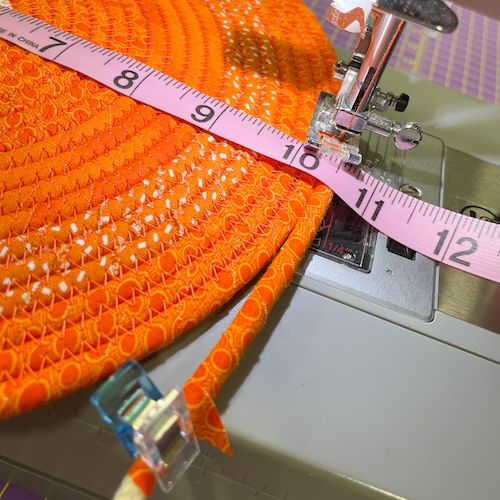
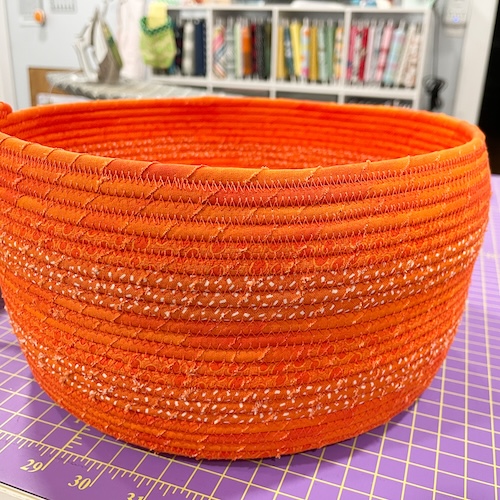
- Continue sewing around your circle until the diameter reaches 10-14 inches for a basket.
- While leaving the needle and foot in the down position, use your left hand to raise the circle up so it is vertical and touching the side of your sewing machine as pictured. Doing this will create the sides of the basket.
- Continue sewing with a zig zag stitch while holding the base circle upright the entire time.
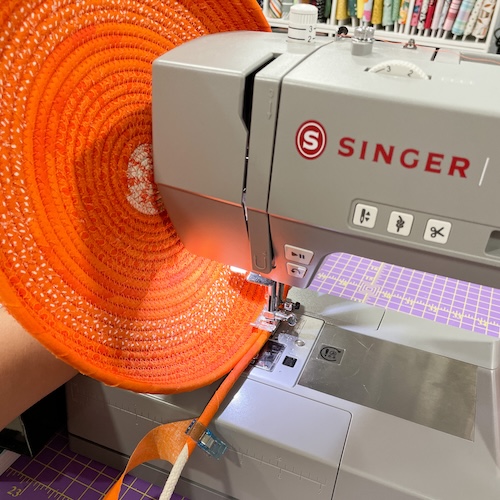
- Use your right hand to control the rope being added to the basket to create the shape of the sides.
- PRO TIP: To control if your sides flare out, stand up straight or curve inwards depends on how loose or tight you pull on the rope as it is being sewn.
- For outward curved edges do not pull on the rope
- For straight edges pull slightly on the rope
- For inward curved edges pull firmly and slow down your sewing speed.
- It is recommended to slightly pull on the rope when you first start making the sides to give the basket more stability when finished. Once the sides are starting to form after a few times around then you can adjust your tension on the rope to form the sides to your liking as mentioned in the previous step.
- PRO-TIP: Sometimes it helps to see how the basket is forming when off the machine sitting flat on a table to make sure the shape is coming out to your liking. Just be sure to secure your stitches before removing the basket from the machine and when starting back sewing again.
- The height of your basket is completely up to you.
- For the bowl pictured it was a base of 8” with a side height of 3”
- For the basket pictured on the title page, the base is 10” wide with a side height of 8”.
- For the bowl pictured it was a base of 8” with a side height of 3”
- Once you get to your desired height you can cut the end of the fabric wrapped rope off and stitch all the way to the end. I recommend stitching back and forth a few extra times to secure the end of the basket.
- PRO-TIP: You can cut a 2” long piece off one of your extra fabric strips and stitch that down over the end of the rope at the top of the basket to cover the end, protect it from fraying, and give it a clean finish.
Basket Lid:
- Use the rope you had leftover from the basket to make the top. We will begin by creating the brown stem. Change your thread and bobbin in your sewing machine from orange to brown thread.
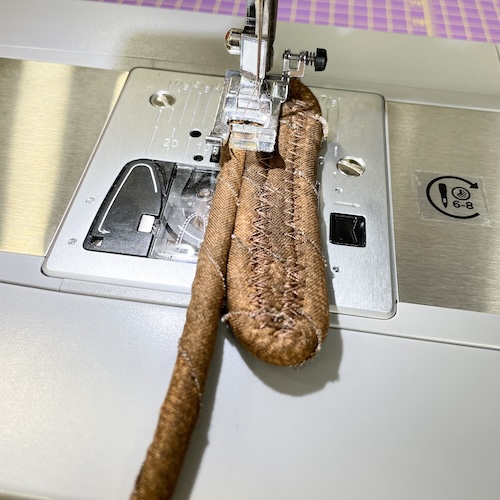
- Decide how long you want your stem to be. The basket pictured has a stem that is 4 inches long and 5 ropes wide.
- Wrap the rope with 1-2 brown fabric strips depending on the length of your strips. Instead of rolling the rope in a circle, this time it will be an oblong shape.
- Start by measuring 4 inches from the end of the fabric wrapped rope and then fold down alongside the rest of the rope. Use straight pins to hold the folded rope securely next to each other.
- Place the folded end under your presser foot and use the same zig zag stitch as before to stitch down the 4 inch length until you reach the end of the rope.
- Be sure to backstitch at the beginning to secure your starting stitches.
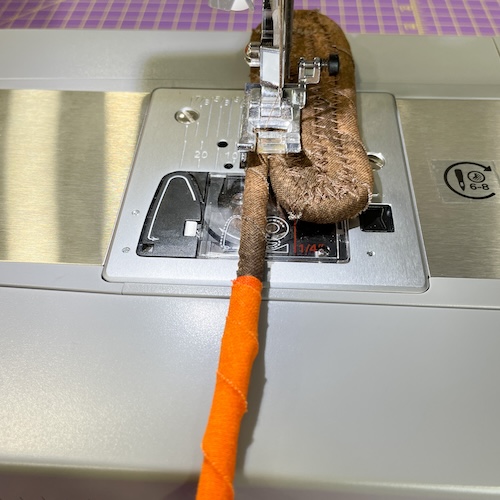
- Once you are at the end, leave your needle in the down position, lift your presser foot, and spin the stem around lining up the new brown fabric wrapped rope down the next side. Lower your presser foot and continue stitching down the next side.
- Continue rotating and stitching down each side of the stem until it is 5 ropes wide. DO NOT CUT THE ROPE!

- At the end of the stem remove any extra brown fabric that might still be on the rope and then wrap the rope in orange fabric starting right where the brown fabric ended.
- Change your thread from brown back to orange and don’t forget the bobbin.
- Next begin to roll the orange fabric into a circle just like we did at the beginning of the basket. This time you will have the stem attached to the center of the circle coming out the top. Make sure you are rolling the circle in a clockwise direction so the extra rope is coming off to the right. Use straight pins to hold the circle tight when getting started.
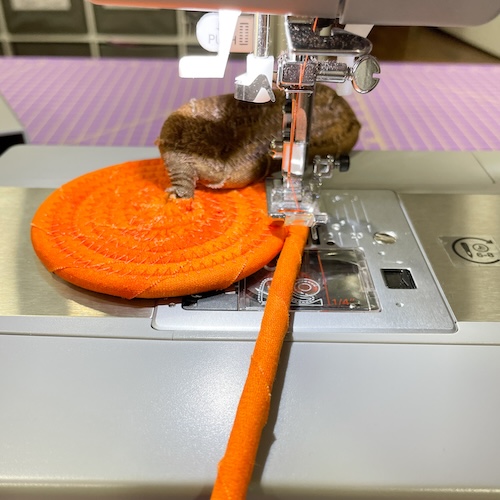
- Place the circle under the presser foot and stitch across the circle in several directions getting as close to the brown stem in the center as possible without stitching over the stem to secure the beginning of the lid.
- Just like when we started the basket, begin stitching around the circle with a zig zag stitch. Continue to add more orange fabric strips as you go.
- Measure the diameter of the opening of your basket. This is how wide you need to make your basket lid before you start turning it up to create the short sides to the lid. The basket in the photo is 8.5” in diameter at the top so the lid is 8.5” in diameter.
- Once you get the lid to the right diameter, with your left hand hold the circle vertically up next to the machine and continue stitching to create the sides. This is just like what we did for beginning the sides of the basket.

- Be sure to apply a steady amount of tension to the rope with your right hand as you are sewing it onto the lid. You can loosen the tension a little after going around the circle two times.
- After going around the circle 4-5 times you should have a 1” lip created around the edges of the lid. Backstitch to secure your stitches and remove from the sewing machine.
- Use your hands to turn the curved edge down in the opposite direction so that your brown stem is on top of the lid and the edges hang down over the basket. Give it a test fit before cutting off any extra rope.
- Once the lid fits your basket you can trim off the extra rope and place a 2” long piece of orange fabric over the end just like we did for the end of the basket to give it a nice clean look.
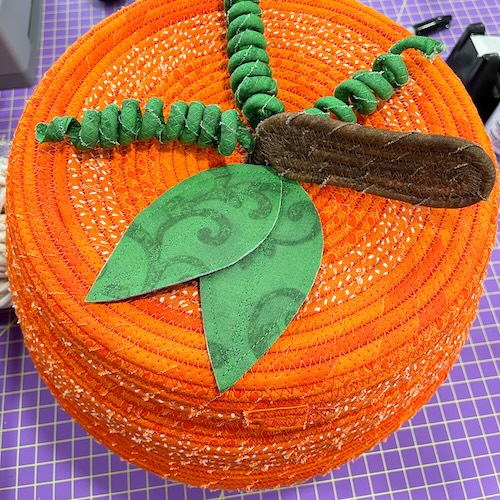
Leaves & Vines:
- To determine the length of your vine, wrap the rope tightly around a pencil for as long as you would like your vine to be and mark this point with a clip or straight pin or marker. I made each vine a different size so it wouldn’t look uniform.
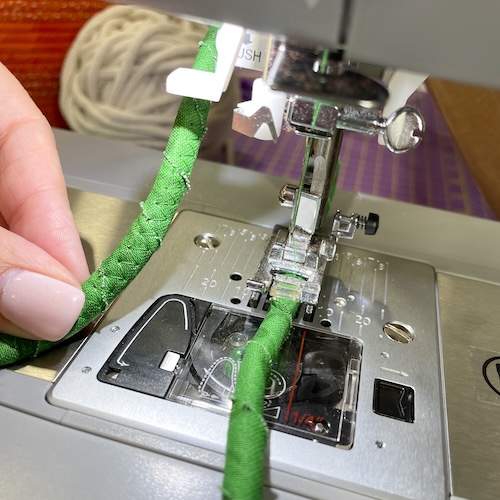
- Unwrap the rope from the pencil and straighten it out. Wrap the rope in a green fabric strip from end to end.
- Swap out the orange thread in your sewing machine to green including the bobbin.
- Set your sewing machine to a zig zag stitch with a width of 3mm but keep the length at 2.5mm.
- Starting at one end of the rope, begin a zig zag stitch down the center of the rope. This is attaching the fabric to the rope. Trim your threads when done.
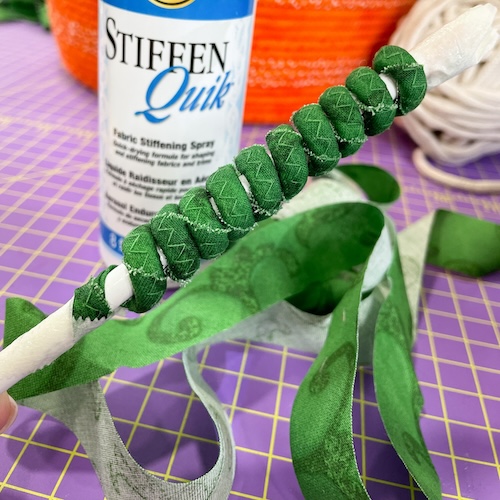
- Wrap the green fabric wrapped rope tightly around a pencil again. Use tape to secure each end of the rope to the pencil so it stays securely around the pencil.
- Next spray the fabric stiffening spray generously all over the rope on the pencil making sure to saturate each side.
- Be sure to protect your surface before spraying or go outside to spray or spray over a trash can.
- Repeat this process for however many vines you wish to add to your pumpkin basket. I recommend doing them all at once as they do require some time to dry.
- PRO-TIP: you can speed up the drying time by using a hair dryer on a low setting.
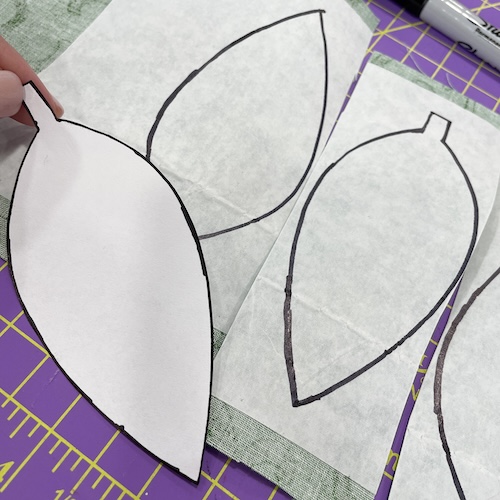
- While the vines dry, let's make some leaves. Print and cut out the leaves on the included leaf pattern.
- Trace 4 leaves onto the paper side of the lightweight fusible interfacing.
- Iron the interfacing onto the back side of the green fabric.
- Cut out the leaf shapes and remove the paper backing. It will leave a shiny side on the back of the leaf. That is the adhesive that will attach it to the batting.
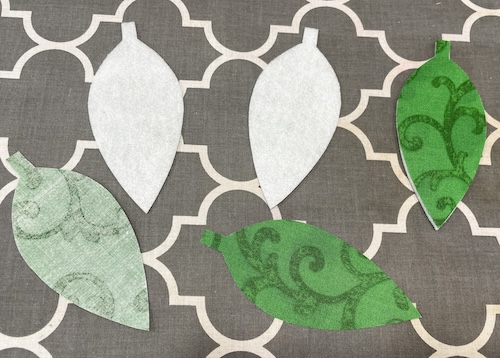
- Trace 2 leaves onto the one side of the batting and cut out the leaves.
- Place a green fabric leaf shiny side down on top of the batting leaf lining up the edges. Press firmly for a few seconds to adhere the fabric to the batting. Flip over and repeat on the other side. Do this for all the leaves you make.
- I originally cut out 3 leaves but chose to only attach 2 leaves to the basket lid. You can add as many leaves as you prefer.
- I originally cut out 3 leaves but chose to only attach 2 leaves to the basket lid. You can add as many leaves as you prefer.
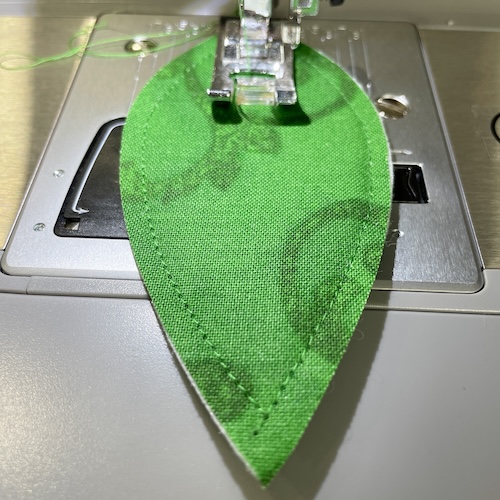
- Set your sewing machine to a straight stitch with a length of 3mm and stitch around the edge of each leaf.
- (Optional) Pick a decorative stitch on your machine to stitch down the center of each leaf to give it more character.
- The final step is to use a needle and matching thread to secure the vines and leaves to the top of your basket lid. I also stitched the stem down so it would stand up on its side as pictured.
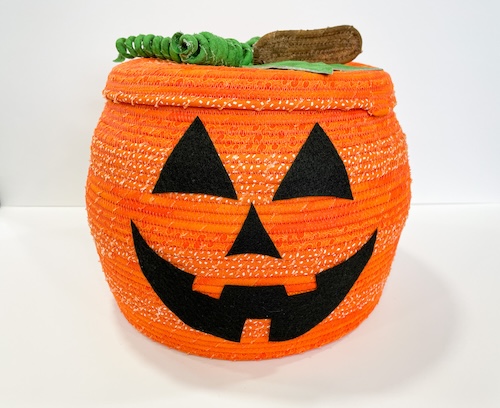
Pumpkin Face:
Another fun way to decorate your pumpkin is by cutting out fun and spooky faces with black felt. This is a great way to get the kids involved. Felt will naturally stick to the side making it optional to change the face on your pumpkin basket. You can also stitch it down with a couple hand stitches or you can use a spray adhesive which will permanently secure the face to your basket. Reminder to always use spray adhesives safely in a well ventilated spay and wear proper PPE (mask, gloves and safety glasses) 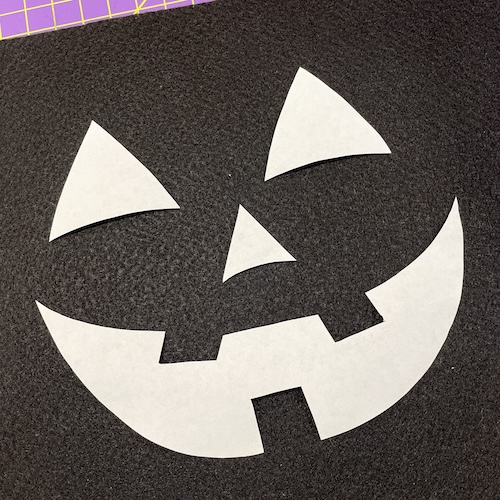
YOU DID IT! It is now time to fill your pumpkin basket with candy and get ready for trick-or-treaters!
Share your finished pumpkin basket with us by using the hashtag #singersewing or tag us on Facebook or Instagram. We can’t wait to see what you create!