 Italy
Italy
All That Glitters Pumpkin Trick or Treat Bag – DIY Halloween Craft
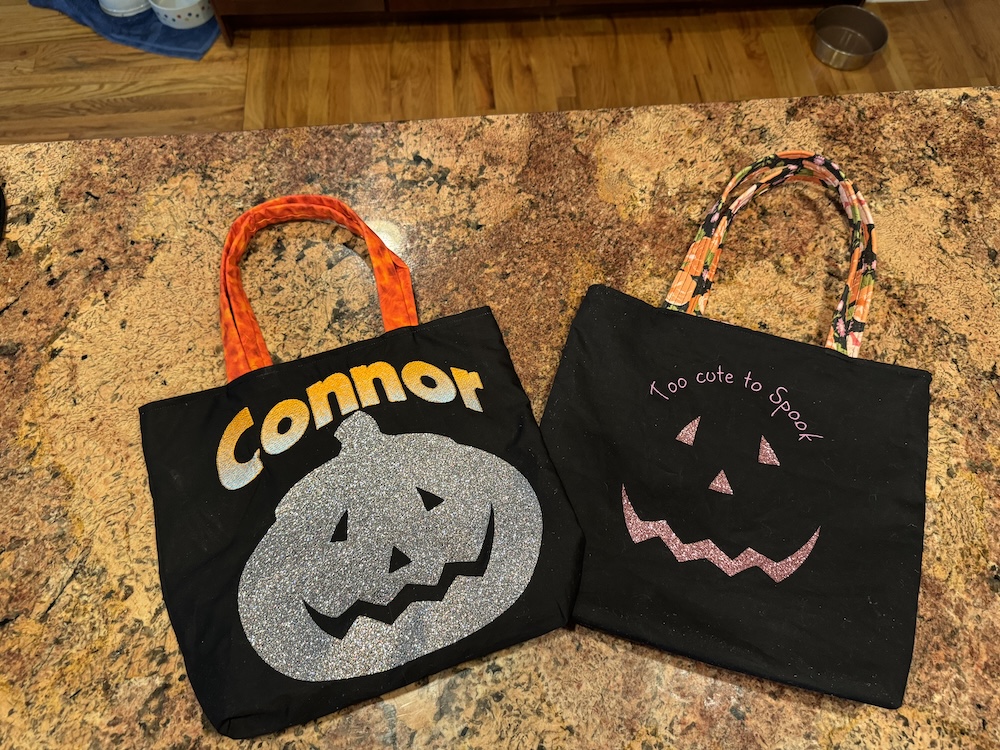 Halloween is the perfect time to craft the cutest trick-or-treat bag for your little ghosts and goblins! This DIY pumpkin-themed bag, decorated with glitter heat transfer vinyl, adds a festive sparkle without the mess of loose glitter. Whether it's for collecting candy or carrying soccer uniforms and dance clothes, this bag is as versatile as it is fun. Follow this simple tutorial to create a glittery Jack-O-Lantern bag that will brighten up the spooky season!
What you need:
- (2) 14” x 14” of Fabric 1 for outside of bag
- (2) 14” x 14” of Fabric 2 for inside of bag
- Optional: (4) 14” x 14” fusible interfacing for Fabric 1 and 2 to provide additional fabric support
- (2) 2.5” x 18” strips of coordinating or matching fabric for handles
- (2) 7/8” x 18” décor-bond or other stiff stabilizer for handle
- (1) 2” x 11” décor-bond or other stiff stabilizer for bag bottom
- MySewnet™ Embroidery Software: Silver, Gold or Platinum Level
- Embroidery Designer Royal Hoop II, 200x360mm
- Tear-away stabilizer
- MySewnet Momento Crafting file: Jack-o-lantern
- Sized in the MySewnetTM Crafting Software to approximately 9” x 9”
- Cut on the Momento with glitter heat transfer vinyl
- Be sure to save the mouth, nose and eye cutout pieces. They are used on the back of the bag.
- Sewing and Embroidery Supplies
Creating the Embroidery Design
- Open the embroidery software and choose Blank Canvas. Select the 260 x 360 hoop, natural orientation, or similar size.
- Click on Letters.
- Select Astra font and 55 mm size.
- Type the Name you want to embroider and select the green Apply checkmark.
- If it does not automatically center in hoop, click the center in hoop icon, then rotate 90o by clicking on the 45 o twice.
- One the Design Panel, change the two colors to coordinate with your artistic vision. Two contrasting colors will create the ombre effect that will be stitched out.
- On the name there will be a box with green squares and a small yellow box in the upper right hand corner. Left click on the edge of the yellow box. Another menu will pop up with shape options. Select Curve.
- 8.Drag the green square handles up and down to create the curve you desire. You will need to move the green handles above and below the name to create your shape.
- Save design and send to your MySewnet enabled sewing and embroidery machine or your MySewnetTM Cloud.
- Repeat the above steps to create the “Too Cute to Spook” embroidery. Use the Kids font, sized for 20 to 24mm, curve as desired.
Fabric and Embroidery Preparation
- Cut a 1.5” corner out of each 14” x 14” square along one edge, one cutout on each side. This edge is the bottom of the bag. Do this for all four fabric pieces.
- Using Fabric 1, the outside of the bag fabric, with each piece fold the fabric in half, with the cutout corners oriented on the bottom. Finger press, open up and then with a ruler draw a chalk line down the center crease.
- Place the wrong side of the vinyl pumpkin onto the right side of Fabric 1 to determine where you will place the pumpkin. Do NOT iron it on yet. Draw a horizontal line ¼” above the top of the pumpkin. This will be the guiding line for placing your name embroidery above the pumpkin.
- Repeat step 3 with the back of the bag Fabric 1, placing the mouth, nose and mouth as desired. Draw chalk lines as before to help orient the embroidery. Remove vinyl before embroidering.
Embroidery
- Hoop Tear-a way Stabilizer.
- Load embroidery design created in mySewnet™ Software on your MySewnet enabled Sewing & Embroidery Machine.
- Attach hoop to the embroidery arm.
- Turn on projection.
- Center the chalk drawn crosshairs on Fabric 1 front of the bag in the center of the hoop. Use temporary adhesive spray or pins to hold in place, if desired. Move design as needed to place the bottom center of the name just above the horizontal chalk line drawn and centered on the vertical line. Be careful to orient the fabric correctly so that the embroidery stitches at the top of the bag, right side up.
- Stitch out embroidery, selecting Baste around Design to hold fabric in place.
- Once the embroidery design is complete, remove hoop and carefully remove the basting stitches. Remove stabilizer around the design.
- Place the pumpkin vinyl on the fabric. Cover with a pressing cloth and adhere the vinyl to the fabric according to manufacturer instructions.
- Repeat embroidery steps 1 – 8 for the back of the bag.
Making the Bag
- Place right sides together of Fabric 1, the outside of the bag. Sew a ⅜” or ½” seam down each side and along the bottom of the bag. Using a 2.0 stitch length will yield a stronger seam. Use pins or clips as needed. Do not sew the cut outs at the bottom of the bag.
- Fold the 1.5” cut out sides so that the back and front right sides are together. Pin and sew a ½” seam on the diagonal.
- Turn bag right side out
- Place the 2” x 11” décor-bond bag bottom inside the bag, zigzag stitching along the center lengthwise to hold in place. You will likely need to cut the strip down to fit the bag bottom, depending on your seam allowances.
- Repeats steps 1 – 3 with Fabric 2, the lining fabric.
- For the handle, fold each 2.5” x 18” strip in half, right sides together lengthwise. Stitch ¼” seam along the 18” edge. Turn right side out and insert the 7/8” x 18” décor-bond strip into the Fabric 2 strip. Using a safety pin attached to the décor-bond makes it easier to pull down the length of the handle. Make two handles.
- Pin one handle to the right side of the bag front, approximately 3 inches from each side seam. Make sure the handles are oriented downward for sewing. The edge of the handles should be even with the bag edge or overhanging slightly. Repeat for the back of the bag.
- Pin the bag lining Fabric 2 to the outer bag Fabric 1, right sides together, nesting the bags. Make sure the handles are oriented between the outer and inner fabrics below the top edge.
- Sew a ½” seam all the way around the bag, leaving a 3” opening near one side seam.
- Turn the bag right side out through the 3” opening. working the bag lining into the outer bag.
- Nest the bag lining into the outer bag and press the outer edge to prepare for top stitching.
- Top Stitch all the way around to close the 3” opening and secure the bag top.
Trick or Treat! Enjoy your Halloween with this adorable bag!