 South Africa
Reversible Overlock Quilt
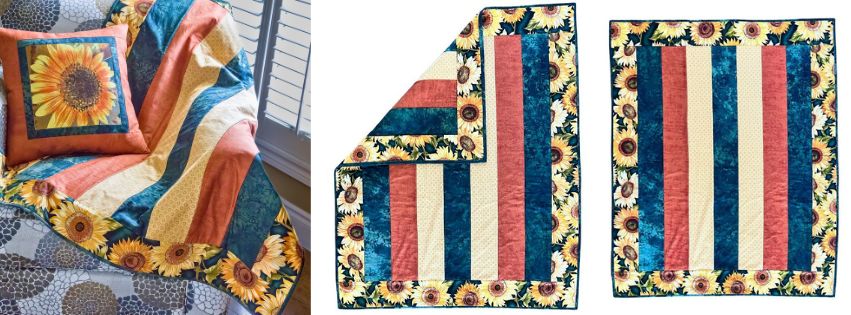
Strip quilts can be pieced together with batting and backing for a one step quilting technique. Sandwiching fabric, batting and backing together can achieve this. Plus, because of the high speed of the overlock machine sewing rows of strips together is much faster than on a conventional sewing machine.
Approximate Size: 40½” x 49½” (103 x 126cm)
What you need:
- Overlock machine
- Sewing machine
- ¼" Piecing Foot
- Stitch-In-Ditch Foot
- 1⅛ yds (1.1m) Main Print for borders
- 1¼ yds (1.2m) Dark Print for
piecing strips and binding - ⅝ yd (0.6m) Medium Print for
piecing strips - ⅝ yd (0.6m) Light Print for piecing strips
- 1⅝ yds (1.5m) lightweight cotton batting
- 3 neutral color cones overlock polyester thread
- 50wt cotton sewing thread
- Overlock needle size 90/14
- Universal needle 90/14
- Chalk marker
- Rotary cutter, ruler and cutting mat
- Steam iron and Ironing surface
- Pins
- Thread snips
Cutting Instructions
- Main Print:
8 - 5” x 45” (12.5 x 115cm) borders - Dark Print:
6 - 5” x 45” (12.5 x 115cm) piecing strips
5 - 2½” x 45” (6.5 x 115cm) binding - Medium Print:
4 - 5” x 45” (12.5 x 115cm) piecing strips - Light Print:
4 - 5” x 45” (12.5 x 115cm) piecing strips - Lightweight Cotton Batting:
11 - 5” x 45” (12.5 x 115cm)
Overlock Set-up
- Set your overlock machine for a 3-thread wide overlock stitch according to your User’s Guide.
- Insert a size 90/14 Overlock needle into your overlock machine.
- Thread with neutral color cones of polyester overlock thread.
- Test sew using a scrap of cotton on the top and bottom with a piece of batting sandwiched between, adjust to get a balanced 3-thread wide overlock stitch.
Serge
- For the first border, sandwich a 5” x 45” (12.5 x 115cm) piece of batting between 2 - 5” x 45” (12.5 x 115cm) of Main Print. The right sides of the Main print should be facing out.
- Serge the long side of the border strip sandwich. When serging do not cut off any of the fabric, just let the fabric line up to the blade of the overlock machine.
Row 2 (Dark Print)
- For the next row place 2 - 5” x 45” (12.5 x 115cm) Dark Print right sides together with the top and bottom of the border strip sandwich. Place the 5” x 45” (12.5 x 115cm) piece of batting on the bottom of the Dark Print.
- Pin together.
- Serge along the length, removing the pins as you approach them.
- Bring the Dark Print top strip and the Dark Print bottom strip plus the batting forward so that it encases the
serged seam. - Press.
Row 3 (Medium Print)
- For the next row place 2 - 5” x 45” (12.5 x 115cm) Medium Print right sides together with the top and bottom of row 2. Place the 5” x 45” (12.5 x 115cm) piece of batting on the bottom of the Medium Print.
- Pin together.
- Serge along the length, removing the pins as you approach them.
- Bring the Medium Print top strip and the Medium Print bottom strip plus the batting forward so that it encases the serged seam.
- Press.
Row 4 (Light Print)
- For the next row place 2 - 5” x 45” (12.5 x 115cm) Light Print right sides together with the top and bottom of row 3. Place the 5” x 45” (12.5 x 115cm) piece of batting on the bottom of the Light Print.
- Pin together.
- Serge along the length, removing the pins as you approach them.
- Bring the Light Print top strip and the Light Print bottom strip plus the batting forward so that it encases the serged seam.
- Press.
Rows 5 - 9
- Continue to add the strips for rows
5 - 9 using the quilt as you go technique in the following sequence:- Row 5 Dark Print
- Row 6 Light Print
- Row 7 Medium Print
- Row 8 Dark Print
- Row 9 Main Print (border)
- Serge along the outer length of the Main Print.
- Press.
- Draw a straight line along the top edge with a chalk marker to make a straight edge on the quilt top.
- Cut along the marked line.
- Repeat for the bottom of the quilt.
Top and Bottom Borders
- Add the 5” x 45” (12.5 x 115cm) Main Print
border strips to the top and bottom of the quilt using the same quilt as you go piecing method. - Serge along the outer length of the
Main Print top and bottom borders. - Press.
Binding the Quilt
- Set up your sewing machine and insert a Universal size 90/14 needle.
- Attach the ¼” Piecing Foot and select a straight stitch.
- Sew the binding strips together end to end to form one long strip.
- Fold the strip in half lengthwise, wrong sides facing and press.
- Start at the side of your quilt and stitch the binding to your quilt.
- Turn the binding to the back of your quilt and pin.
- Straight stitch in place from the right side using the Stitch-In-Ditch Foot. The flange of the foot rides in the ditch to keep your stitching straight.
Enjoy your reversible quilt and as an added bonus look for instructions on how to make the matching Sunflower PhotoStitch Pillow.