 Switzerland
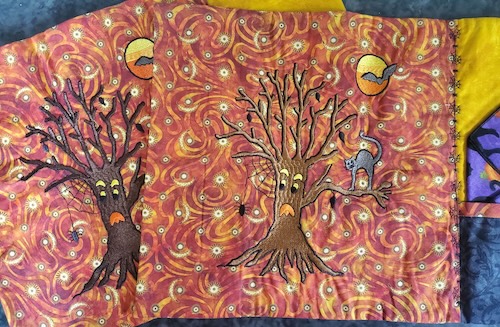
Hauntingly Spook-takular Table Runner'
DIY project allows you to design placemats for every season, bringing a fresh and personalized touch to your dining table. Whether you're a beginner or an experienced crafter, these easy-to-make placemats are the perfect addition to your home décor, offering a fun and practical way to celebrate in style.
What is Needed:
- Sewing and embroidery machine
- Sewing thread and bobbin to coordinate with fabric
- Embroidery Design File
- Metal Hoop 200 x 200mm (HV #920597096)(Pfaff #8210335960)
- Stabilizer to fit selected hoop
- Embroidery thread
Fabric (per place mat)
- Fabric 1: Main fabric
- 5” H x 12.5” W
- Fabric 2: Right side & Back
- 5” H x 5.75” W
- 5” H x 18.5” W
- Fabric 3 Pocket
- 5” H 5.75” W
- Fabric 4 Pocket Lining
- 5” H x 5.75” W
- Fusible fleece or Cotton batting
- 5” H x 18.5” W
Embroider: (If desired)
- Attach embroidery unit to sewing machine
- Mark exact center of fabric right to left and top to bottom to be embroidered for the Scary Tree design
- Mark up 1” from center bottom of fabric and exact center right to left for Spring Garden
- Place stabilizer and fabric on appropriate hoop
- Use the baste around design option
- When embroidery complete remove from hoop.
- Press the right side of fabric under to the wrong side ½”
- Set aside
Sewing: Pocket
- Stitch pocket lining to pocket outer fabric right sides together using ½” seam.
- Press lining fabric up and back down the inside of pocket.
- Place pocket w/ lining at the bottom of 13.5” H x 6.5” W on right side fabric.
- Baste 1/8” from right, bottom & left side of fabric together.
Assembly:
- Lay fleece or batting on flat surface.
- Place backing fabric 13.5” H x 18.5” W to right side up on top of fleece/batting align all sides
- Place embroidered or plane piece fabric 13.5” H X 12.5” W right sides together on right side of fabric back and fleece/batting (bottom edge of design to the bottom of stack ) Pin in place
- Place pocket with right side piece 13.5H x 6.5” W on the left side of fabric stack right sides together. Pin in place
- Using a straight stitch sew around all four sides
- Clip corners, trim fleece/batting really close to stitching
- Turn right side out where right and left side meet in the middle.
- Using a decorative or straight stitch close the opening where right side overlaps left side.
- Quilt if desired.
- Top stitch around all four sides!
Enjoy your beautiful table!!!