 Canada
DIY Mermaid Costume
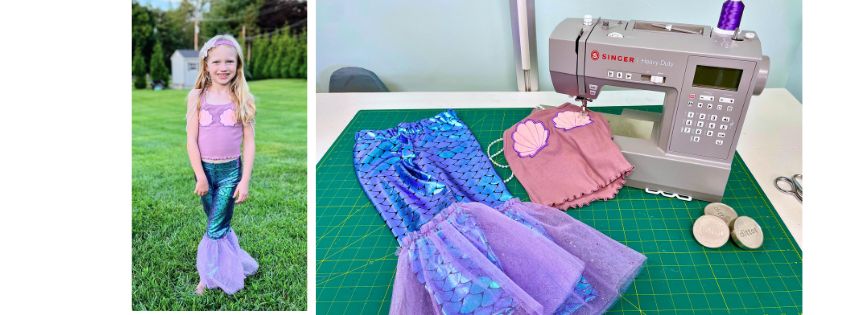
Get ready for Halloween with this DIY Mermaid Costume, created using a leggings pattern! In this tutorial, you’ll also learn how to add appliqué seashells to a t-shirt to perfectly complement your mermaid leggings and complete the costume!
MERMAID LEGGINGS SUPPLIES:
- Ditto Lara Leggings Pattern: Get it here!
- 4-way stretch knit fabric:
- 60” wide folded: 1 ½ yards
- 45” wide folded: 2 ½ yards
- 1 1/4” Elastic (see pattern for length based on size)
- 3/4 yard tulle
- Pins or clips
- Coordinating thread
- Fabric scissors or rotary cutter
- Serger or sewing machine with ballpoint needle
SEASHELL APPLIQUE TOP SUPPLIES:
- The size of your seashells is up to you and will determine how much material you will need. Cotton is recommended for easy sewing and comfortable wear on the t-shirt but you can also use other materials such as felt, fleece, faux leather or vinyl as well.
- T-shirt, tank top, or bodysuit of your choice.
- Paper Backed, Sewable Iron-On Adhesive (double sided)
- Fusible No Show Mesh Iron-On Stabilizer
- Tear Away Light Soft Temporary Stabilizer
- Rayon Thread (this can match or contrast your material)
- 90/14 Universal Sewing Machine needle
- Straight pins
- Marking Pen
- Fabric scissors
- Iron
- Seashell Pattern (attached for you to download and print out at home. Adjust your printer settings to adjust the size of the seashells you want to use)
- Optional pearl trim to embellish
DIRECTIONS FOR MERMAID LEGGINGS:
- You can purchase the Ditto pattern here or if you own a Ditto you can project that pattern through your subscription. When you download the pattern it will include instructions on how to sew up the leggings pattern step-by-step. In this document we will be sharing the steps for adding the tulle at the bottom of the leggings. These leggings have a ⅝” seam allowance unless noted otherwise.
- Recommend sewing the leggings on a serger but it can be sewn on a sewing machine using a stretch stitch and ball point needle.
- Once you cut your legging pieces use the following steps to add tulle before returning to Ditto instructions.
- Mark a line 2” below shorten lengthen line on the front of each leg piece
- Measure the line drawn. Measure the distance from the line to the cut edge of your legging piece
- Fold the tulle in half vertically, then again horizontally. Cut rectangles, with one long edge being a folded edge. The Width of this rectangle should be 2.5-3 times the length of the calf measured. The length should be the length measured plus ½”
- Sew a basting stitch through the folded edge of the tulle
- Gather tulle down to be about 2” wider than the calf of the legging. Pin the tulle onto the line drawn.
- Starting ⅝” in, Stitch the tulle using a zig zag stitch 2mm wide, 3mm long. Pull gently on the legging as you sew. This will ensure the legging calf is still stretchy after tulle is attached. End ⅝” before the raw edge of your fabric.
- Fold the legging in half, right sides together, pin or clip inseam, fold tulle inside so that it does not get caught in the inseam
- Sew or serge inseam.
- Continue Ditto instructions Steps 2-4.
- Cut the waistband elastic 2-2.5” shorter than the waist measurement.
- With leggings right sides out, pin or clip inseam of tulle. Sew and turn right side out.
DIRECTIONS FOR SEASHELL APPLIQUE TOP:
- Cut out your seashell pattern
- Thread your machine with all purpose or rayon sewing thread in top and bobbin.
- Set your machine for a zigzag stitch at a 5mm stitch width and 0.4mm stitch length to create a satin stitch.
- Cut a piece of Fusible No Show Mesh Iron-On Stabilizer big enough to cover the inside of the top behind where the seashells will be placed.
- Turn the top inside out and place the shiny side of the mesh stabilizer down onto the inside front of the top.
- With an iron set to Medium High (cotton) with no steam, gently press the stabilizer onto the inside front of the top until it is adhered.
- Turn the top right side out and set aside.
- Cut a piece of Paper Backed Iron-On Adhesive the same size as your piece of fabric used to create the seashell.
- Place the fabric right side down onto the ironing board and press out any wrinkles. Place the Iron-On Adhesive shiny side down onto the wrong side of the fabric.
- With an iron set to Medium High (cotton) with no steam, gently press the Iron-On Adhesive onto the fabric. Check to make sure the adhesive has adhered to the fabric by carefully lifting the corner. If the back of the fabric is shiny then it is adhered properly. If the back of the fabric is not shiny then continue pressing.
- Before removing the paper backing of the Iron-On Adhesive, trace the seashell pattern onto the paper with a pen or marker. Cut out the seashell shape with scissors.
- Remove the paper backing after cutting out the seashells.
- Lay the top flat onto your ironing board with the front right side facing up and carefully place the seashells adhesive side down onto the t-shirt wherever you want it to go.
- With an iron set to Medium High (Cotton) with no steam, gently press the seashells onto the front of the t-shirt. It is now bonded to the t-shirt.
- Cut a piece of Tear-A-Way Light Stabilizer larger than the size of the seashells and slide it inside the top ensuring the seashells fit within the space. This stabilizer does not adhere to the top so pin it in place to prevent it from moving around while sewing. You will end up with 2 types of stabilizer on the inside of the top. This is ideal when attaching any applique to a stretchy knit material like a t-shirt, tank top, bodysuit, etc.
- The sewing machine needs to be set to a zigzag stitch with a 5mm width and 0.4mm length to make a wide but close together stitch to sew all the way around the seashell. This type of stitch is commonly known as a satin stitch.
- It is easiest to start at a corner point at the bottom left corner of the seashell and work your way around.
- Be sure to line your fabric up so that the needle stitches through the seashell fabric and the top back-n-forth. It helps to keep the edge of the seashell fabric lined up with the center mark on your presser foot.
- Begin stitching around the seashell. When you get to a tight curve or corner be sure to leave the needle down, lift the presser foot, slightly turn or adjust the fabric, lower the presser foot and continue sewing. Take your time with this step.
- Don’t forget to back stitch at the beginning and end to secure the stitches in place.
- Make sure to have a full bobbin before starting this step.
- When you are going around a curve or corner, make sure you do not leave a gap in your stitching.
- After stitching all the way around both of the seashells, remove the pins and place the top onto a flat surface and lay your seashell pattern back on top to mark the lines on the middle of the seashell with a fabric pen.
- Back at the sewing machine, you can use the same stitch settings or you can change to a straight stitch to stitch the center lines of the seashell to give it more detail.
- Turn the top inside out and carefully trim any threads and remove the excess Tear-A-Way Stabilizer.
- Using scissors, trim off the excess Fusible No Show Mesh Stabilizer.
- Turn the top right side out and you have officially appliqued your seashells onto a knit top!
- Optional: Attach pearl trim to shoulders by hand sewing.